
Fracture Series
I was always the bane of teachers because I took classes and then did something totally unrelated to the technique being taught. The Fracture pieces started in a 1999 workshop by Susan Lea Hackett about how to piece floral and nature shapes. I used the opportunity to develop a technique for piecing, slashing, and repiecing over and over to produce complex mosaics of color.
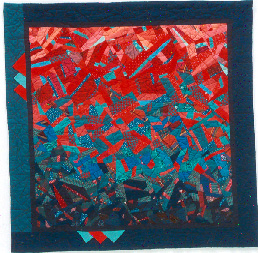
Red Up, 1999 – 44″ x 45″
Susan had instructed us to bring 10 shades, light to dark, of two different color families. Because I had rarely used red in my work, I decided to explore what the color could do. This was the first piece, merging red with blue-green.
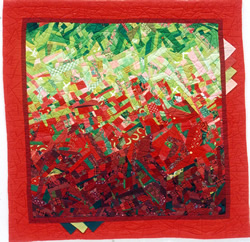
Red Down, 1999 – 45″ x 46″
The obvious sequel to the red/blue-green of Red Up was a split triad using red and yellow-green. The challenge was to avoid something that looked Christmasy. The edges of this series are decorated with “prairie points.” Rather than folding the points in the traditional manner, I put two fabric squares together of different colors, stitch all the way around the square, cut diagonally, turn right-side out, press, and insert the cut edge into the seam as one does the folded edge of a regular prairie point. This allows more color play while emphasizing the broken glass look I sought. All the quilts in this series are machine quilted with ombréd heavy cotton cord in a random jagged triangle pattern to emulate the crazed surface of old china.
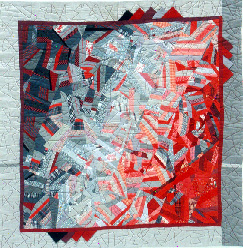
Red This Way,
2000 – 44″ x 45″
I then wanted to see what else I could do with red. To “blend” the colors in this series, I needed a number of bi-colored fabrics. Few or none existed in the stores in my color combinations, so I made them, using various techniques. For example, I would buy a print combining white and one of the colors, then use ink or dye to color in the white areas with the blending color. Or I would use solid red (or green, gray, or camel) and cover the surface with satin-stitched stripes, plaids, and patterns on the sewing machine. Or I would fuse on stripes or dots of the opposing color.
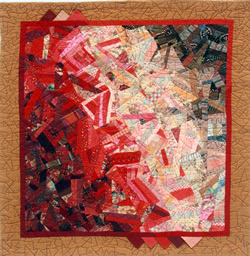
Red That Way,
2000 – 46″ x 46″
My least favorite in this series, Red That Way won an honorable mention ribbon at the Marin Quilt show, San Rafael, CA. Art is obviously in the eye of the beholder! To “blend” the colors in this series, I needed a number of bi-colored fabrics. Few or none existed in the stores in my color combinations, so I made them, using various techniques. For example, I would buy a print combining white and one of the colors, then use ink or dye to color in the white areas with the blending color. Or I would start with a piece of solid red (or green, gray, or camel) and cover the surface with embroidered stripes, plaids, or patterns on the sewing machine. Or I would fuse on stripes or dots of the opposing color.